IT AIN’T ALL ABOUT THE BIRD – STUFFING CAN MAKE OR BREAK THE T-DAY MEAL (BUT IT ALL STARTS WITH THE BIRD… and the bread!)

tksday 11-12_068

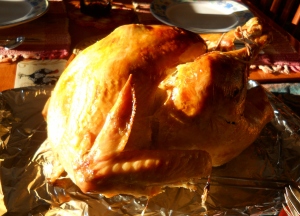
On the other hand, there are so many considerations about that bird and the stuffing to go with it, before we even get to the roasting/eating part:

  • How big a bird? (Definitely want leftovers. Ours was a 17+ pounder.)
  • What else about the bird? (Bought a “natural, fresh” turkey this year. Generally winds up juicier.)
  • To brine or not to brine? (Never tried it, wasn’t about to this time.)
  • If not brining, how to ensure it’s nice and moist? (I loosened the skin and injected homemade turkey broth.)
  • What about flavoring for the skin? (Basting with melted butter can’t be beat; sprinkled with pepper and a few herbs such as dried parsley, marjoram, thyme and/or rosemary.)
  • What to do with all the “stuff” that’s inside? (Take the “stuff” – gizzards, heart, etc, out of the bird, put in saucepan, add water to cover, sprinkle with salt and pepper, bring to boil, then simmer until liquid is reduced by ⅓ to ½. Discard “stuff” and put aside liquid for later gravy-making.)
  • How about the inside of the turkey? (Always rub with salt. Further, I considered two options: either cut a lemon in half and pull some frozen “fresh” rosemary out of the freezer, then stash it in the bird’s cavity; OR fill it with stuffing. I went with option #2.)
  • How long do I cook it and at what temp? (I always look to see if it gives hourly rates on the fowl’s packaging. If not, I check one of my many cookbooks or go online. I never seem to retain this kind of info in my brain, or maybe I just worry too much about screwing it up! I do recall that 325 degrees Fahrenheit is the best temp. Still, I try to buy a bird with one of those pop-up gadgets that tells you it’s done, and then I’ll use a meat thermometer to check doneness anyway!)
  • How to get it properly done without burning the skin? (I cover with aluminum foil until about the last hour in the oven. Then I remove the foil and baste a few times during next hour to ensure nice browning.)

Those are my Basics About the Bird. Not a recipe, just a guideline. Because this post is really about the stuffing. No, it’s about the prelude to the stuffing: the croutons that make up its bulk.

Prep for the stuffing began the day before Thanksgiving, with concocting homemade croutons (not all of these would go into the stuffing either—some were ground into bread crumbs for sprinkling atop potato casserole). I was determined that, this year, I would not buy a single bag of those pre-made croutons found in the supermarket. Their listing of ingredients includes whatever additives the manufacturer deems necessary to make sure the little dried-out bread bits stay dry, don’t mold, manage to last from factory to store to your house – which probably means that, even if not bk food rulesdeemed toxic by the government, there are still ingredients in that bag that your (or my) grandmother would not recognize as food. (Rule #2 in Michael Pollen’s Food Rules: An Eater’s Manual [Penguin Press, 2009, 2011]: “Don’t Eat Anything Your Great Grandmother Wouldn’t Recognize as Food.” I happen to be old enough that I can eliminate the “Great” since my Grandmothers were born in the late 1800s! Also note that Pollen’s Rule #3 is, “Avoid Food Products That No Ordinary Human Would Keep in the Pantry,” which means all of those ingredients on labels that I can’t pronounce, let alone remember…).

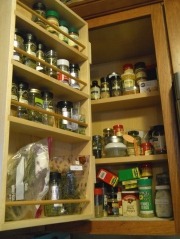
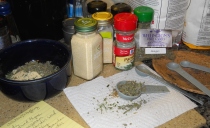
I started with a good loaf of Italian bread from Bella Napoli Bakery and I used excellent dried spices, many of which I purchase at the Schenectady Green Market. There’s a great vendor there, March through mid-December (they head south for the winter) called Wellington’s Herbs & Spices, out of Schoharie County. In fact, I’m super-glad I made it to the Green Market today – needed more dried parsley (I use a ton of it) – because I learned that next week is their last SGM Sunday until March. This means I will do my best to get back there next weekend, after assessing my stock of dried herbs, to be sure I have an adequate supply for several months!

tksday 11-12_031

tksday 11-12_030

But I digress… back to the croutons. And a little kitchen magic.

ckbk kitwitch companion
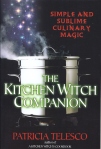
If you’ve been checking out KitchenCauldron for a while, you know I sometimes like to throw in a bit about the “magical associations” of food, which often can be connected to what science has discovered about the healing (and sometimes detrimental) properties of food. I like that one of the tenets of Patricia Telesco’s “Kitchen Witch’s Credo,” as set forth in her book The Kitchen Witch Companion: Simple and Sublime Culinary Magic (Citadel Press, Kensington Publishing Corp., 2005) reads, “There is nothing on this earth that cannot be used for magic.” She also states, “Life is a ritual and act of worship,” and “Kitchen witchery always reflects your own principles.” I believe our “principles” are developing and re-developing over our entire lifetime. A couple of decades ago I might have thought creating croutons in my own kitchen was cool but Pollen’s Rules #2 or #3 wouldn’t have come into the picture. I am older, somewhat wiser and much more worried about the fate of this planet and its inhabitants than decades ago.

As one of those earth-bound occupants, I find it soothing to know that bread is associated with kinship and sustenance (think “communion”); that parsley and garlic are endowed with protective energies (and parsley might also enhance one’s luck); that coriander denotes love, well-being and intelligence; that marjoram’s magical properties are said to include peace and love. It’s interesting to me that the sage sprinkled over my croutons speaks of wisdom and ckbook witch in kitchredemption, and that its thyme could aid in banishing nightmares. Cait Johnson, in Witch in the Kitchen: Magical Cooking for All Seasons (Destiny Books, 2001), writes, “Our culture considers cooking a chore; we are encouraged to get it over with as quickly as possible. But it may help us to remember that cooking was once a magical act. Cooks were priestesses who wielded the power of fire, transforming raw ingredients into nourishment for themselves and their families. The act of cooking linked women with the Goddess, the Great Nurturer.” In a fundamental way, women (and men too) are empowered through their ability to cook/bake. This is true alchemy.

So think of this as a simple bit of alchemy, transforming bread into gourmet-like croutons – which can make stuffing scrumptious, enhance favorite soups and be further transmuted into tasty bread crumbs to top all sorts of dishes.

tksday 11-12_035

EASY-TO-MAKE, (Maybe) MAGICAL CROUTONS
Yields two large cookie sheets full of croutons (maybe 5-6 cups?)

Ingredients

  • One large loaf Italian bread, sliced into cubes about ½’ to ¾” square
  • 5-6 tablespoons olive oil
  • 1 tablespoon dried thyme
  • 1 tablespoon dried marjoram
  • 1 teaspoon coriander seed
  • 2 tablespoons dried parsley
  • 1 tablespoon garlic granules
  • ½ teaspoon dried basil
  • 2 tablespoons dried sage

Process

  1. Pre-heat the oven to 375 degrees Fahrenheit.
  2. Grease two large cookie sheets with one tablespoon of olive oil each.
  3. Spread the bread cubes out over both sheets, trying not to overlap any.
  4. Combine thyme, marjoram, coriander, parsley, garlic granules, basil and sage in a bowl and mix together welltksday 11-12_032
  5. Sprinkle the dried herb mixture over all the croutons.
  6. Sprinkle the remaining olive oil over the herb-sprinkled bread cubes.
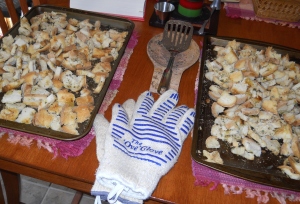
  7. Bake in oven until turning golden-crunchy, using a spatula to turn cubes over after about 10 minutes (don’t panic if you can’t get all of them turned – it will work out just fine!). Toasting should take from 20 to 25 minutes, but start checking earlier and keep an eye on their progress. Ovens vary, temperature-wise.
  8. Remove from oven and allow to cool completely.
  9. Store in a plastic bag until using the next day in stuffing or other recipe. Or store for up to a week. (To make bread crumbs, just toss into food processor and process for a minute or two until they reach desired consistency.)

tksday crouton 11-12_036

Next blog entry: the stuffing!

EVERYBODY’S FAVORITE: RICH VANILLA CUPCAKES

Here’s the last cupcake recipe from the WomanWords 15 Year Birthday Reading. It’s taken a while to get everything related to that event posted (busy with so many other things, including my blog related to connections to the International Women’s Writing Guild and those SisterWriters. While one of my favorite truisms is, “So Many Books, So Little Time,” I could just edit that to say, “So Many Creative Possibilities, So Little Time!”

This recipe was derived from the “Traditional Vanilla Birthday Cake” in The Magnolia Bakery Cookbook: Old-Fashioned Recipes from New York’s Sweetest Bakery by Jennifer Appel and Allysa Torey (Simon & Schuster, 1999). It’s the same one I used to concoct the Gluten-Free Almond Cupcakes also offered at the Caffé reading.

Not surprisingly, these were the most popular of cupcakes that night. I guess everyone loves an old standard! (And by the way, have I ever mentioned that vanilla is considered to be a powerful love stimulant? Only the real stuff works, however, according to what I’ve read – but then nothing artificial is ever quite as good. American women, at one time, even dabbed it behind their ears to attract men! In this case, of course, we were stimulating a love of words… but then, who knows what was going on out in that audience?)

Without further ado, the recipe…

VANILLA CUPCAKES
Yields 24 cupcakes (or, as the Magnolia Bakery recipe suggests, 1 three-layer cake)

THE CAKES

Ingredients

  • 1 cup (2 sticks) unsalted butter, softened
  • 2 cups granulated sugar (I’m now mostly buying “evaporated cane juice” organic sugar – BJ’s has started to carry it!)
  • 4 large eggs, at room temperature
  • 1½ cups self-rising flour
  • 1¼ cups all-purpose flour
  • 1 cup milk (since I only stock 2%, I subbed a bit of heavy cream for some of the milk)
  • 1 teaspoon bakery emulsion (or you can use vanilla extract, as the original recipe lists)

Process

  1. Pre-heat oven to 350 degrees Fahrenheit.
  2. Place 24 paper cupcake fillers in cupcake tins, or grease and lightly flour each cakespace.
  3. In a large bowl, using an electric mixer at medium speed, cream the butter until smooth.
  4. Add sugar to butter gradually, then beat until fluffy (about 3 minutes).
  5. One at a time, add eggs. Beat well after each addition.
  6. Combine the flours in another bowl using a whisk.
  7. Add flour mixture in four parts, alternating with the milk and bakery emulsion (or extract if using that), beating well after each addition.
  8. Divide batter between the prepared cupcake tin spaces.
  9. Bake for 20 to 25 minutes or until a cake tester or toothpick inserted into a couple of the little cakes comes out clean.
  10. Remove tins to wire racks and allow to cool for about 10 minutes.
  11. Remove cakes from pans to wire racks to cool completely before frosting or freezing. (If freezing, individually wrap in plastic wrap as soon as cooled, eliminating all air. They should keep for at least up to two weeks or even a month. I had never frozen cupcakes before but, via the internet, learned that one should take the wrapping off before thawing – as soon as taken out of the freezer – or they will have a gluey top texture. Then frost. That worked out great!)

THE FROSTING

Ingredients

  • 1 cup (2 sticks) unsalted butter, very soft (if you run out of unsalted butter, salted is OK to use)
  • 3½ cups confectioners’ sugar (have extra available in case you need more)
  • ¼ cup milk (I used 2% milk but whole or 1% works just as well; can always add more if too stiff)
  • 1 tsp. vanilla powder (or vanilla extract, if preferred)
  • Food coloring, if desired
  • Decorative sprinkles or colored sugar, if desired

Process

  1. Place butter in large mixing bowl.
  2. Add 2 cups confectioners’ sugar, milk, and vanilla powder (or extract).
  3. Beat until smooth and creamy.
  4. Add remaining sugar, gradually, until icing is a good spreading consistency.
  5. Mix in food coloring, if using.
  6. Decorate cupcakes with icing (also with sprinkles or decorating sugar, if using).
  7. Frosting keeps best if eaten within 3 days (which works out well, since cupcakes also keep best for first 3 days).

A TRIP TO HEAVEN – CUPCAKES FOR CAFFÈ LENA

When we were kids and teens, Mom baked our birthday cakes – and an occasional holiday cake – from box mixes. It was the ’50s and ’60s and housewives were brainwashed into thinking this was the way to go. Easy. Convenient. Just as delicious (that’s what Americans were told anyway). To us they were delicious and, of course, fun. She’d decorate with her own buttercream frosting, some purchased tubes of gel-like icing, a few pre-manufactured (and stiff) sugar letters or shapes, and possibly an appropriate number of candles atop. Voilà! A cake any kid would love. Especially if it came with birthday presents.

On the other hand, we’d be invited to my cousin Rene’s kids’ parties sometimes, where we’d witness cakes seemingly carved to simulate whatever party theme their mom had selected for the day. For example, I’m recalling one such cake, a virtual locomotive constructed of cake, frosting and whatever auxiliary accessories Rene (pronounced Ree –nee) decided would work in the design. Maybe she whipped up her confections starting with a box too, but it didn’t matter. To a child, they were magic. Fun. Even if the child wasn’t the birthday boy or girl. And the cake, of course, satisfied any sweet tooth.

In Kathleen Flinn’s newest book, The Kitchen Counter Cooking School: How a Few Simple Lessons Transformed Nine Culinary Novices into Fearless Home Cooks (Viking, 2011), there’s a whole chapter entitled “What’s in the Box?,” wherein she relates a story about how her husband Mike one night decided to bake a cake. When he gets stressed out (and this time it was after watching a particularly aggravating defeat of his alma mater’s football team), he has to do something with his hands. So this time he went into the kitchen, searching for a cake mix to beat up. When he found there were no such mixes to be had, his wife said, “We have all the stuff for cake… just look up a recipe.”

“Really? Mike asked. “You mean you can make a cake without a mix?”

A few minutes later, after looking up a recipe, Mike called out, “So what’s in the box?”

“What are you talking about?”

He brought a printout of a recipe for yellow cake into the living room. “You’ve got to see this. So get this, it’s just flour, eggs, baking soda, milk, sugar, and butter. But with a box you already add eggs, milk, and oil, so what’s in the freakin’ box?” He was agitated. “Just flour, sugar, and baking soda?”

Good point, Mike. Great chapter, Kathleen, about just what we’re putting into our bodies. Oh—to end that little tale: Mike made the cake, using his mother’s prized 45-year old mixer (a permanent fixture in their kitchen), and another revelation came through.

…“So that’s it? This doesn’t take any longer than doing it from a mix.”

Perhaps that’s not always true. Pulling out the flour, sugar, baking soda and maybe a few more ingredients than Mike did (he was making a basic yellow cake), plus measuring, might add a few extra minutes – but not much. Certainly not enough to outweigh the fact that the answer to Mike’s question about what’s in the box is, in short, a bunch of chemicals designed to give the high-on-sugar, hydrogenated-and-high-fructose-corn-syrup-included product a longer shelf life. Food science at its finest: add sugar (and sugary substitutes), trigger the necessary neurotransmitters “to provide an artificially enhanced pleasure response,” and there you have it – another customer who will come back for more. Forget about what’s good for them.

And then there’s the flavor. Nothing like a great homemade cake.

Nowadays, it’s rare that you’d find a cake mix on my shelves. I suppose it helps that I’m retired and can more readily “fit” the baking of a scratch cake into my schedule, but retirement doesn’t necessarily mean you’re less busy. It merely allows one to have more personal control of one’s schedule. I do not have to be at a jobsite by a certain time, nor do I have to ask permission to leave for appointments with doctors, dentists, hairdressers and the like. I am my own boss. I can set up a meeting with writing friends or my annual health physical for 1 p.m. in order to allow time to bake a cake – or a batch of cupcakes – in the morning. Still, it was well before retirement that I began to pull away from box cakes. It’s been at least a couple decades since I’d snatch up several Duncan Hines cake mixes whenever they’d come on sale. They’re good. Tasty. Just not as good as homemade. Not as healthy. And the fun, it seems, is in the creating of baked goods from scratch – whole food ingredients, tweaking the spices my way, deciding what way to go with frosting…

So it was fun deciding what kinds of cupcakes to bring to Caffè Lena’s for next week’s open poetry mic. My writing collective, WomanWords, will be “The Feature” that evening, and I suggested – and promised – to bring cupcakes to celebrate our 15-year birthday. We began as a monthly writing group (now evolved into special-events-only, such as daylong workshops and retreats) in April 1997. Hard to believe it’s been that long –  that it’s all happened, including meeting some of my now-very-best friends through WW, because of the International Women’s Writing Guild. We’ll celebrate with decorated cupcakes, asking for a donation for each to benefit historic Caffè Lena. I made the first batch yesterday and froze them, to frost and adorn next Wednesday.

Marilyn with cousin Renee, 1991

Before I get to the recipe, I must relate one final family memory related to cakemaking, however indirectly. Cousin Rene was daughter to my Aunt Helen, Mom’s oldest sister, so she was closer to my mother’s age than to mine (five years younger than Dolly, actually). She was a whirlwind of activity all of her life, a creative lady. She also loved to travel, learn new things, attend exercise classes, garden and more. Despite giving up smoking at least a couple decades earlier, she was diagnosed with lung cancer in her 70s, which took her from us in the summer of 2007.

Mom attended Rene’s wake/funeral with us. Although we told her where we were going, that Rene had passed away, she didn’t quite “get it” until we walked into the large sitting room at the funeral home (her dementia or Alzheimer’s had progressed to where she could no longer live alone as well). She chose to sit with her sister Helen near the front, holding her hand almost the entire time. Bill and I found seats further back in the crowded room. Toward the end of the service, when attendees were asked to offer memories about Rene, I eventually stood up to comment. “No one has yet mentioned her creativity,” I said. “It came out in lots of ways but my first memory is about the cakes she made.” I went on to explain that she’d create amazing stuff, contrasting it with my mom’s delicious but simply-adorned cakes. From the front row, to my far left, a slightly indignant voice piped up with “Thanks a lot!” My mother, who by then couldn’t tell you what she had for breakfast an hour beforehand and sometimes still thought she should be at the job from which she’d retired at age 72, still had her spunk – and she’d apparently decided her cakes had been insulted! The whole room cracked up in laughter, a welcome break in the sorrow. (Sadly, Mom passed away two weeks after her niece and we were back in that same funeral home far too soon.)

Below is the recipe (with pictures) for the cupcakes thus far baked for the WomanWords 15th birthday at Caffe Lena, tweaked from the Chocolate Heaven Cake recipe in The Back in the Day Bakery Cookbook (by Cheryl & Griffith Day, Artisan, 2012), mentioned in another recent post (for Brown Sugar Banana Bread). When these chocolate bits of heaven are frosted, there will be another recipe and more photos on KitchenCauldron. For now, I still haven’t decided on the icing type yet…

HEAVENLY CHOCOLATE CUPCAKES
Yield: My batter produced two (2) dozen regular-sized cupcakes, plus six (6) muffin-sized; original recipe was for one (1) 9-inch 3-layer cake

Ingredients

  • 3 cups cake flour (not self-rising, not all-purpose)
  • 4 cups granulated sugar
  • 1½ teaspoons baking soda
  • 1 teaspoon fine sea salt
  • 9 ounces unsweetened chocolate, finely chopped (I used Ghiradelli)
  • 2 cups hot freshly brewed hazelnut decaf coffee, made with Saigon cinnamon and fresh-ground nutmeg while brewing (original cake recipe used regular coffee; I just wanted extra flavor kick)
  • 1 tablespoon vanilla powder
  • 4 large eggs, at room temperature
  • 1 cup canola oil
  • 1 cup sour cream, at room temperature

Process

  1. Position rack in lower third of oven, and pre-heat oven to 350 degrees Fahrenheit.
  2. Place cupcake liners in cupcake baking tins (or butter and dust with cocoa powder or flour, shaking out excess), enough for 3 dozen cupcakes or, as I did, 2 dozen regular-sized cupcakes plus a half-dozen muffin-sized.
  3. In the bowl of a stand mixer (or in a large bowl, using a portable mixer), combine flour, sugar, baking soda and salt. Mix on low speed for two or three minutes to aerate the flour (something new for me – I’d have never thought of “aerating” without the Back in the Day cookbook).
  4. Place chocolate in a medium bowl and add hot coffee and vanilla. Let stand until melted (about 2 or 3 minutes); then stir to smooth consistency.
  5. In another medium bowl, whisk together eggs and oil until thick, satiny and light in color.
  6. Whisk sour cream into egg mixture. Do not overmix; leave some streaks of white.
  7. Pour egg/sour cream mixture into melted chocolate, slowly, stirring as you do so.
  8. Add the entire now-chocolatey mixture, one third at a time, to the flour mix in the large bowl, mixing on medium speed until well blended.
  9. Use a rubber spatula to incorporate any ingredients “hiding” at the bottom (remove the bowl from the mixer stand first, if using stand mixer). Be sure batter is completely mixed.
  10. Fill prepared cupcake-tin spaces (or liners in tins) ⅔ to ¾ full with batter (I did the latter and that worked fine). NOTE: Back in the Day suggests “tapping the (cake)pans firmly on the countertop to remove any air bubbles from the batter,” which I forgot to do – don’t worry if you forget too ’cuz they’re still scrumptious!
  11. Bake in oven for 20 to 22 minutes (25-28 for muffin-sized) or until a toothpick inserted in cake comes out clean (or centers spring back when touched). They’ll have slight cracks on them and come out a deep chocolate color. (If you opt to bake a cake with the batter, the cookbook says to bake for 40 to 50 minutes.)
  12. Let cool for 5 minutes in pans, then remove to wire racks to cool completely.
  13. Sprinkle cooled cupcakes with sifted confectioner sugar, or top with favorite icing/frosting, or freeze as soon as cooled (individually wrapped in plastic wrap, eliminating all air) for up to two weeks. (I’ve never frozen cupcakes before this batch but am told that, when thawing, take the wrap off before thawing or they will have a gluey top texture – then frost; I intend to make the frosting while they’re thawing and then ice the cakes immediately.)

Note: I didn’t freeze the muffin-sized ones. Bill and I had one each, with confectioner’s sugar sifted atop, for dinner the same night baked. Two are getting delivered to our daughter today. The last two are dessert for tonight, maybe with Cool Whip atop. I think they had to have “heaven” in their title because they are To Die For.

Brown Sugar Banana Bread & “Back in the Day” with Uncle Arch

I didn’t need another cookbook. But then I was in the grocery store earlier this week, scanning through the cooking magazines. I’d already bought (or received via subscription), and read or perused, all my favorites for the month; so I was hoping that some articles or recipes in a less-familiar (to me) mag would catch my eye enough to warrant a closer read at home. A large illustration in Taste of the South did just that – it was the cover of The Back in the Day Bakery Cookbook: More Than 100 Recipes from the Best Little Bakery in the South.

I knew I’d seen it at Barne’s & Noble, maybe even opened it up to a few pages. How could I not? Its authors, Savannah bakery owners Cheryl Day and Griffith Day, adorn the cover. They stand in front of shelves painted a bright blue stationed against an old brick wall painted white, its tiers holding all sorts of bakery paraphernalia and a few cakes. Everything about them is down-home looking, casual and comfortable. He sports tan big-pocketed shorts, a beige/brown plaid shirt and sneakers. She’s in an old-fashioned, red-polka-dots-on-white, short-sleeved dress, with a bit of a dainty feathered or flowered adornment atop her curly-topped head, and dark ballerina-type shoes. A blue apron that I wouldn’t necessarily accessorize with that outfit seems to work exactly right for Cheryl. She balances, waitress-style, a tray of what look like extra-huge cookies. And they aren’t just smiling – they’re laughing!

As I read a bit of the Q&A-formatted article, which highlights the cookbook, a few other things heightened my interest. Number One: their bakery/café is located in Savannah, Georgia, a city I’ve only enjoyed once but could grow to love. Unfortunately, we were driving north from Florida, from visiting various relatives, so we couldn’t stay longer than two overnights – and it happened to be a cold January for the South in 2009 (ok, comparatively speaking, it wasn’t so cold since our adult kids had been through a couple of not-so-great snowstorms during our absence). Still, we toured parts of the city (gorgeous architecture, great history) and managed to stumble across Food Network celebrity Paula Deen’s restaurant, The Lady and Sons. We’d already eaten a yummy lunch at a little café downtown and didn’t plan to go inside, but the hostess happened to mention that we could Just Do Dessert – and that they happened to bake the best pecan pie in the South. Bill had to test out that boast since he loves pecan pie. We did coffee with our pies, Bill nodding happily through his perfect pecan snack, as well as scarfing down what I couldn’t finish of the huge portion of key lime pie I’d ordered!

I also loved the description of the Back in the Day bakery. Homey, a neighborhood place where people gather, a true community deliberately sought by its founders. It doesn’t sound like just southern hospitality – it smacks of “the olden days” when such places existed in neighborhoods everywhere in this country, when fast-food and chain restaurants hadn’t taken over our eating habits and computer screens weren’t our primary source of social networking.

And the recipes! Reviewing the recipe for Chocolate Heaven Cake in Taste of the South convinced me that this cookbook deserved a closer viewing, and that’s just what I did next time I was in a bookstore. I bought it. And the very next day, before I’d even checked out any recipes beyond their Brown Sugar Banana Bread on page 45, I was spending the morning (yesterday) baking the absolute best banana bread I’d ever made, maybe the best I’d ever even tasted! (Of course, I did slightly modify Back in the Day’s bread, creating my own rendition – because that’s what I do, that’s creativity.) I sent three slices over to our daughter Kristen’s apartment for her to enjoy when she got home from work (via Bill, when he went out to run errands), along with some chicken soup made the day before. That evening, she let us know that she’d devoured two of the three slices and gave it a rating of “awesome.”

There’s also something about the expression, Back in the Day…, that got to me. Cheryl Day and Griffith Day didn’t, as you might think, choose it for its nostalgic twist. They liked a different “twist” about it – the play on their last name! Well, we share the last name, but I hadn’t looked at the authors’ names on the book until I read about how they picked it out. I was lost in the nostalgia instead.

Right to left: Aunt Pat (in back), Aunt Dot w/cuz Diane on lap, Grandma Boyd, Uncle Doug (standing), Aunt Pat’s mom & brother, maybe brother’s wife, Uncle Arch (far right)

Back in the Daytweaks memories of the past, of long-gone simpler times. This morning, for example, having spent a good deal of yesterday finishing the two-page “bio” of my Uncle Doug for the “Honor a Vet” ceremony mentioned in my last blogpost, family was on my mind – and for some reason the expression made me think of my Uncle Arch, who wasbriefly mentioned in yesterday’s writing. I imagined him beginning one of his stories with Back in the day..., continuing on with a tale that might be factual, or bear a tidbit of fact, but surely was spun into a fantasy of his own making.

Everyone loved Uncle Arch (real name Archibald, but he’d never tell you that!). He was funny and fun-loving, generous, and quite handsome (as were all the Boyd boys). He could also be unpredictable. My father decided early in his acquaintance with this brother-in-law that he probably ought not to go drinking with him too often – leastwise not unless they were on foot. Mom told me that the first time they did that, “Arch was driving and your father found himself on the road to Kingston or Poughkeepsie or some point far south of Albany, never getting home until the wee hours of the morning!” Dad didn’t drive, so he had no choice but to go along.Two of my funniest memories of my uncle:

Front: Aunt Ann, Uncle Arch; my mom, Dolly. Back: Uncle Doug, Aunt Pat, Aunt Naomi, Walt. (Sometime in the late 1980s?)

When my Aunt Naomi was surprised with a 60th birthday party by her four adult children many years back, Uncle Arch wasn’t present during the “surprising” part but showed up about an hour late. Everyone was saying, “Where’s Arch? Isn’t he coming?” By this time in her life, Aunt Naomi’s husband (Uncle Corley) has passed away but I can’t remember if she was already seeing Walt yet (they would marry sometime later). What I do recall is that there were several people present who did not know Uncle Arch, or not as well as we did, and some of them were Walt’s relatives – so when he walked into the hall, wearing all black duds with a priest’s collar at his neck, many didn’t know he wasn’t some Catholic Father come to bless Naomi! He walked about for a little while, making the sign of the cross and some sorts of holy conversation while those who knew him were in stitches, some with eyes watering from laughter. He definitely livened up the place.

Our yard circa 1989. Brother George, cousin David (sole surviving son of Uncle Arch), Uncle Arch, George’s first wife Sharon, George & Sharon’s son Matt.

Another time – on a visit to their home in Perth, NY (outside Amsterdam) – Bill, our two kids and my mother made the 40-minute trip to see Aunt Ann and Uncle Arch. Adrian, our son, was at that early teen stage where he preferred to be with his friends at home rather than “old” family people, so normally he’d rather not join us when we attended many family events. But he loved Uncle Arch in the same way and for the same reasons my brothers, cousins and I always did. You never knew what to expect from him, but it would often be fun. As we sat in the yard in front of their A-frame, talking about the vegetable garden, Adrian fiddling with an antique wooden mousetrap that my uncle had found somewhere and brought home (totally not humane as it had a trap door that dropped the poor creature to a drowning demise), something about the conversation caught Ade’s attention. Maybe Uncle Arch was testing to see if Ade was listening when he mentioned weird noises out back at night, near the garden. Pretty soon, noting Adrian caught up in the tale, he embellished the story with a spaceship, flashing lights, aliens and an invitation to go for a ride. At that point, we all knew he was BSing us. Adrian grinned back at his great-uncle’s shit-eating grin (you know, like that grin Steve McQueen would flash in The Great Escape, as he strut back into the POW camp, his escape attempt foiled by the Nazis?). Give Uncle Arch a prompt like, It was a dark and stormy night… and off he’d go!

That was Uncle Arch, joke-teller, house painter, Navy war veteran, movie-star good looks, lover of beer and stories. My favorite. Who might’ve started a story with Back in the day… and, on occasions when he pondered some sad or horrific event, would simply say, It don’t make..., leaving off that last word, sense… because sometimes it just doesn’t sense. Especially not the loss of two sons before they even reached middle-age (one murdered, one struck by a car), nor the disabling of their third son and last surviving child. Yet his love of life never faltered, nor his and Aunt Ann’s generous and loving care of their last-surviving son and their grandchildren. Aunt Ann still lives in that A-frame with several of them.

So here’s what I did differently from Back in the Day’s version of banana cake (It was a warm and cozy kitchen… can be your prompt for today):

To start with, I don’t own the prescribed 9” x 5” loaf pan. In my overcrowded baking pans & equipment space (a pull-out shelf over the wall oven, which I don’t dare pull out for fear of several metal objects clattering to the floor below), I could locate a much larger loaf pan (its length measures 9½ inches), a smaller one, and several mini-loafers. I chose the smaller one, 8½” x 4½” x 2¾”, and then buttered up a small ramekin to fill along with the loaf pan (which very nicely provided me with a “sampler” to share with Bill while the larger one cooled). The recipe below, however, is written for the 9 x 5 pan since that’s the amount of batter it will make.

I didn’t put my oven rack on in the bottom of one-third of the oven; I just forgot. It was in the center. Perhaps that might be why my loaf took a little longer to bake. Or not.

The next revision was out of necessity: it turned out I only had ½ cup of light brown sugar but, luckily, an unopened bag of brown sugar sat in the same plastic container on the lazy-susan under the counter. I adjusted the ¾ cup in the original recipe to reflect what I already had.

I love that the original recipe uses mace, an ingredient that I’d found difficult to locate in larger markets around here for a while (all of a sudden, at least Hannaford carries small containers of it now!) – but I reduced the mace, cutting it in half, and then added nutmeg to the mix.

Once I’d mashed up the bananas, I decided to zip a bit of lemon juice on them to stave off the browning while I followed through on the rest of the prep work of gathering together my ingredients (in case you didn’t already know, this is called mis en place).

Back in the Day uses vanilla extract, which would be perfectly fine, but I decided to add vanilla powder instead. I figured the little bit of lemon juice would balance out the loss of a teaspoon of the liquid extract. I hoped adding of lemon, an acidic ingredient, wouldn’t throw off the balance of overall ingredients required for good baking results.

I opted not to add an optional brown sugar sprinkling on top. Good decision – it was plenty sweet enough!

THE VERY BEST BROWN SUGAR BANANA BREAD EVER
Yields One (1) 9-inch loaf

Ingredients:

  • 2 cups unbleached all-purpose flour
  • ½ cup light brown sugar
  • ¼ cup dark brown sugar
  • ¾ teaspoon baking soda
  • ½ teaspoon fine sea salt (or table salt will do)
  • ½ teaspoon ground mace
  • ½ teaspoon fresh ground nutmeg
  • ½ teaspoon Roasted Saigon Cinnamon (regular cinnamon is okay; I use Roasted Saigon variation because of deeper, richer flavor)
  • ¼ cups pecans, toasted then chopped (If you’ve never toasted nuts before, here’s a basic how-to for all three methods; I like either stovetop or oven method.)
  • 1 ½ cups well-mashed, ripe bananas (I had 2 very ripe and 2 just-over-the-green stage of the fruit, about medium sized, that worked out well.)
  • a squirt or two of lemon juice
  • ¼ cup sour cream
  • 2 large eggs
  • 6 tablespoons unsalted butter, melted and cooled
  • 1 teaspoon of vanilla powder

Process:

  1. Lightly grease a 9” x 5” loaf pan with butter or vegetable oil spray. Line the bottom with parchment paper.
  2. In a large mixing bowl, whisk together the flour, brown sugars, baking soda, salt, mace, nutmeg, cinnamon and pecans. Set aside.
  3. In a medium bowl, mix together the mashed bananas, sour cream eggs, butter and vanilla powder with a wooden spoon.
  4. Fold the banana mixture into the flour mix until just combined.
  5. Scrape the batter into the prepared loaf pan, spreading evenly across the top.
  6. Bake for 50 to 60 minutes, or until loaf is golden brown and a cake tester inserted into the center comes out clean. (NOTE: I don’t own a 9” x 5” loaf pan, as noted above – using the smaller pan, plus a ramekin, might have caused my longer baking time, which was something like 70 minutes – or maybe it was my changes to the recipes. Doesn’t matter to me cuz the bread was supreme!)
  7. Cool loaf in its pan for 5 to 10 minutes; then transfer to a wire rack (although I just put it on its platter, which I placed on a rack).

Can’t wait to bake that Chocolate Heaven Cake – but it will become cupcakes, maybe even for the WomanWords (my writing collective) 15-Year Birthday. I should be toting cupcakes to the Caffe Lena Open Mic in Saratoga Springs, NY on April 4, 2012, where WW will be featured. Readers will be Judith Prest, Kristen Day, Lesley Tabor, Leslie Neustadt, Mary Armao McCarthy, Kittie Bintz, Kelly de la Rocha and myself. Doors open at 7 p.m. – come join us if you’re nearby and free!

Uncles, World War II: front – David; back, left – Archibald; back, right – Douglas